
There are probably many of you out there with an old Mitsuba project that used to work, but you can’t get it to compile anymore. Or even worse, you received a project from a previous supervisor student, and well, it uses Mitsuba…
📃In this article, we will build Mitsuba 0.6 on Ubuntu18.04 with **Anaconda **and Docker, which will consist in creating a Dockerfile. Similar instructions should work on Ubuntu18.04 regardless of Docker.
❗We are not going to build the **GUI **for Mitsuba.
⌛TL;DR: Here you can find a Dockerfile for Ubuntu18.04, similar to the one we will create in this post, alongside one for building on Ubuntu20.04.

Mitsubais a research-oriented rendering system.
The **current **version of **Mitsuba **is Mitsuba 2, which brought a significant change from the previous version (0.6, which is the version we are going to build today).
🔢In this article, if not specified, when mentioning Mistuba I will be referring to 0.6.
Although Mitsuba’s repository is still maintained-ish, building it on Ubuntu can be non-trivial. In particular, if you require to build python bindings for a specific version of Python. You can find the instructions for how to build Mitsuba in their documentation.
One of the most significant issues when building Mitsuba is the **dependencies **that change from ubuntu 18 onwards. The instructions provided in the documentation still work for ubuntu 16, but they miserably fail on 18+. Although a few changes are necessary to build on 18, you probably want to build Mitsuba without messing up your Ubuntu environment. For this, we are going to use Docker.

Mitsuba provides 🐍 **Python bindings **so we can work with it from any Python script. When working with Python, especially on Ubuntu, I prefer to use Anaconda. **Anaconda is an excellent tool since it allows one to manage Python environments, dependencies and packages. Another great additional feature of Anaconda is installing all the Nvidia/Cuda related libraries necessary to run Pytorch or Tensorflow on the GPU. Finally, Anaconda will also build Boost **for your selected python version, making our life easier!
Docker for the rescue

Docker* is a set of platform as a service products that use OS-level virtualization to deliver software in packages called containers. Containers are isolated from one another and bundle their own software, libraries and configuration files; they can communicate with each other through well-defined channels. *Wikipedia
Armed with Anaconda, which will take care of Python, we will use 🐳**Docker **to handle building an **image **of the desired version of Ubuntu, build Mitsuba and see the different ways we can use the Mitsuba from our container.
💡Note that: An **image **is a read-only template with instructions for creating a Docker container. While a container is a runnable instance of an image.
First of all, you need to install Docker, and you should follow the instructions provided in their documentation.
To build our image, we need a Dockerfile. A Dockerfile specifies how to build an image, and it can run most commands you would be able to use on the target os. However, before running any command, we need to select the base image to use:
FROM ubuntu:18.04
From is used to specify the **base image **that will be used. This unless differenly specified will be downloaded from the Docker Hub repositories.
Now that we have set up our base image, it is time to install Anaconda. We can either choose **Anaconda **or **Miniconda **(containing only the basic packages)and follow the instructions here to get the latest version for your OS. Otherwise, we can select a specific version from the anaconda repo for our target system and python version. Installing Anaconda with the python version you require is not necessary, but by doing so, we can use the base Anaconda environment created when installing Anaconda. (For the sake of simplicity, this is what we are going to do in this article, but you can derive the alternative solution by following the same steps)
RUN wget \
    [https://repo.anaconda.com/miniconda/Miniconda3-py37_4.10.3-Linux-x86_64.sh](https://repo.anaconda.com/miniconda/Miniconda3-py37_4.10.3-Linux-x86_64.sh) \
    && mkdir /root/.conda \
    && bash Miniconda3-py37_4.10.3-Linux-x86_64.sh -b \
    && rm -f Miniconda3-py37_4.10.3-Linux-x86_64.sh
Run executes a command that we could normally execute in our os
then we need to export Miniconda as a **path **variable so we can call conda commands that we need to set up our Python environment and dependencies.
ENV PATH="/root/miniconda3/bin:${PATH}"
ENV sets **permanent **environment variables (that propagates from the build to when the docker is run)
alternatively ARG could be used if we want **temporary **envionment variables that will persist only during the build process.
Now that we can invoke conda, we can install the Boost** **library (alternatively, you can build from source, but installing with Anaconda makes it much easier).
RUN conda install boost -y
this instruction tells Conda to install boost and to say yes -y to all
Building Mitsuba
Now that we also have Conda and our Python environment set up, we need to install Mitsuba’s dependencies:
RUN apt-get update \
    && apt-get install -y \
    build-essential \
    qt5-default \
    libqt5opengl5-dev \
    libqt5xmlpatterns5-dev \
    libcollada-dom-dev \
    scons \
    git \
    libpng-dev \
    libjpeg-dev \
    libilmbase-dev \
    libxerces-c-dev \
    libboost-all-dev \
    libopenexr-dev \
    libglewmx-dev \
    libxxf86vm-dev \
    libpcrecpp0v5 \
    libeigen3-dev \
    libfftw3-dev \
    && apt-get clean \
    && apt-get autoclean \
    && apt-get autoremove
Note that some libraries are different from the ones provided by the Mitsuba documentation.
Now we can download Mitsuba code and build it. Unfortunately, if you are using a version of Python> 3.6, you will have to edit some files, which you could do with some commands in the Dockerfile. Still, I made this easier by creating a fork of Mitsuba that sets the scripts correctly (it also doesn’t build the GUI by default).
WORKDIR /mitsuba
RUN git clone [https://www.github.com/Quartenia/mitsuba.git](https://www.github.com/Quartenia/mitsuba.git)
WORKDIR sets the current working directory
Among the changes you can find in the fork, I added the correct directory where Conda (either Miniconda or Anaconda) installed the Boost python lib:
‘/root/miniconda3/lib/’
‘/root/anaconda3/lib/’
Then we copy the config file to be used by scons and issue the scons building process:
WORKDIR /mitsuba/mitsuba
RUN cp build/config-linux-gcc.py config.py \
    && scons -j8
Mitsuba uses **scons **for building. We could have installed scons with conda install scons, but it would have installed only the version for python3, while Mitsuba uses scons files for the python2 version.
On ubuntu≥20 apt-get install scons would install python3-only scons), If you want to use python3 scons config files have a look at this branch.
Finally, we need to add mitsuba and Python binding to the path variables (this closely follows the instructions provided in setpath.sh)
ENV MITSUBA_DIR="/mitsuba/mitsuba"
ENV PYTHONPATH="/mitsuba/mitsuba/dist/python:/mitsuba/mitsuba/dist/python/3.7:$PYTHONPATH"
ENV PATH="/mitsuba/mitsuba/dist:$PATH"
ENV LD_LIBRARY_PATH="/root/miniconda3/lib/:/mitsuba/mitsuba/dist:$LD_LIBRARY_PATH"
Here we use ENV again, because we want our environment variables to persist after the build.
Now that our Dockerfile is ready, we can build it by running the docker build command.
docker build -t your-name/mitsuba-conda ./dockerfiles/ubuntu18.04
./dockerfiles/ubuntu18.04 is the relative **location **to our Dockerfile. your-name/mitsuba-conda instead is the **name **we want to give to our image.
If your build was successful, you should see a similar log in the terminal:

🔍Let’s test it!
Test Mitsuba Python Bindings
To test if everything is set up as intended we first need to run our Docker image:
docker run -it your-name/mitsuba-conda
the option -it tells Docker to run our image in **interactive mode **(--interactive or -i) and give us direct access through the terminal.
So let’s first test the mitsuba python binding by running:
docker run your-name/mitsuba-conda python3.7 -c “import mitsuba;from mitsuba.core import Vector;print(Vector(1.0, 2.0, 3.0))”
Make sure to specify the correct **version **of Python installed with Conda (in our case python3.7. By default, the command python might invoke a python version istalled with scons.
The code snippet between "" just checks that we can import Mitsuba from Python and use some of its core functionalities (initializing a Vector3)
In case something went wrong, Python will not be able to import Mitsuba and you will see this in the terminal:

On the other hand, if you did everything correctly you should see this:

Render a scene
The only step left is to test that we can actually render a scene, which is what we are really here for!
There are different options on how you can go about this, I provide an alternative here.
This time we are going to test it by running the container without a terminal but providing the mitsuba command from the docker run command:
docker run --mount type=bind,source=”$(pwd)”/your-folder,target=/app your-name/mitsuba-conda /app/your-scene.xml
What we are doing here is: **mounting **your-folder in our **container **to render your-scene.xml.
your-folder will be mounted in /app, and with the **command **mitsuba /app/your-scene.xml we can **render **the scene.
Let’s try with a scene provided from Mitsuba’s website:
-
download the Cornell Box scene cbox.zip from http://mitsuba-renderer.org/download.html.
-
Unzip cbox.zip, then in cbox.xml change the second line <scene version=”0.4.0"> to <scene version=”0.6.0">.
-
Finally run:
docker run --mount type=bind,source=”$(pwd)”/cbox,target=/app your-name/mitsuba-conda mitsuba /app/cbox.xml
This command will output cbox.exr in the folder where cbox.xml is located, in our case /cbox . If everything went according to plan your cbox.exr should look like this:
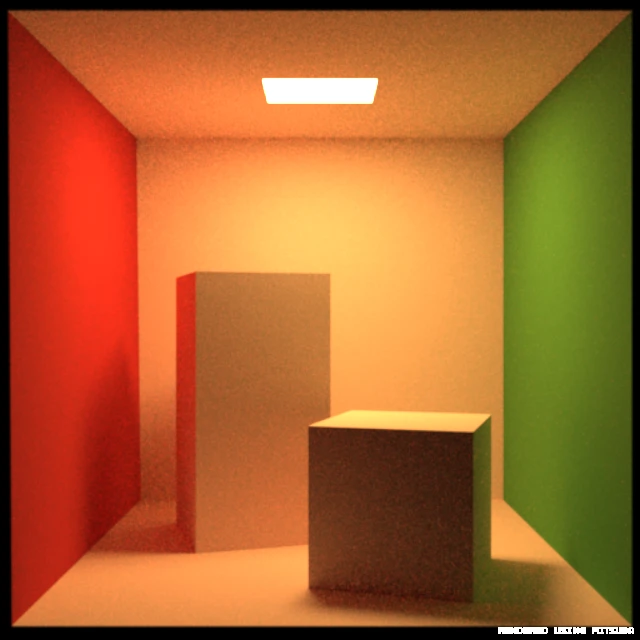
Mission accomplished!
A path-traced Cornel Box!
🤔 I am having issues building the GUI with qt5 on both ubuntu18 and 20. If you know of any solution please let me know in the comments :)